Yes. Another coffee table. I know. Apparently we just can’t make up our minds on this very important piece of living room furniture.
If you’re new to this blog, you might not know that I already made a new coffee table (with a fun epoxy top) back in May last year. So, what could possibly possess us to change it up so soon? Well, two things. First, it had gotten bumped pretty hard a few times making the legs a little less sturdy. Plus, we got a new couch. And it’s grey (our last couch was a greenish yellow). So the grey coffee table just didn’t look right with it, and I can’t leave well enough alone, apparently.
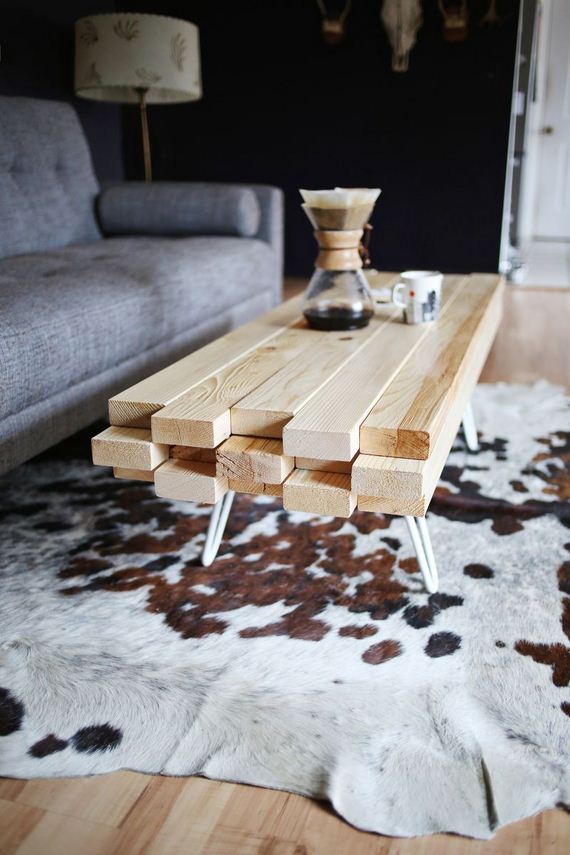
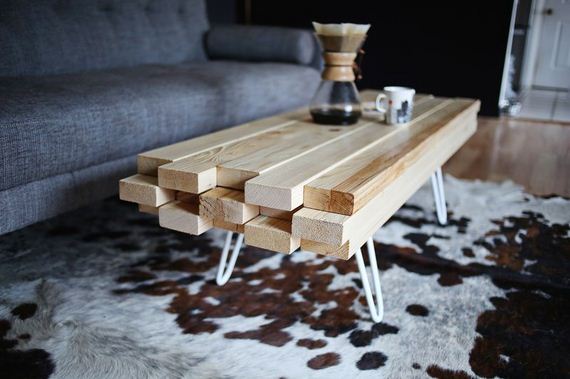
So, we made another coffee table. And it’s probably our favorite to date.

Really, Trey came up with the idea for turning something like this beautiful 2×4 table into something smaller that could work as a coffee table.
Building the coffee table out of basically a bunch of cut-to-size 2×4 boards turned out to make this a super easy project. After buying the supplies, the building portion only took a couple hours (less if you had your boards cut to size already), and then sealing it took only as long as the dry time. Easy!
Supplies:
-(9) 55x2x4 inch boards
-(12) 8.5x2x4 inch boards
-(2) 13.5x2x4 inch boards
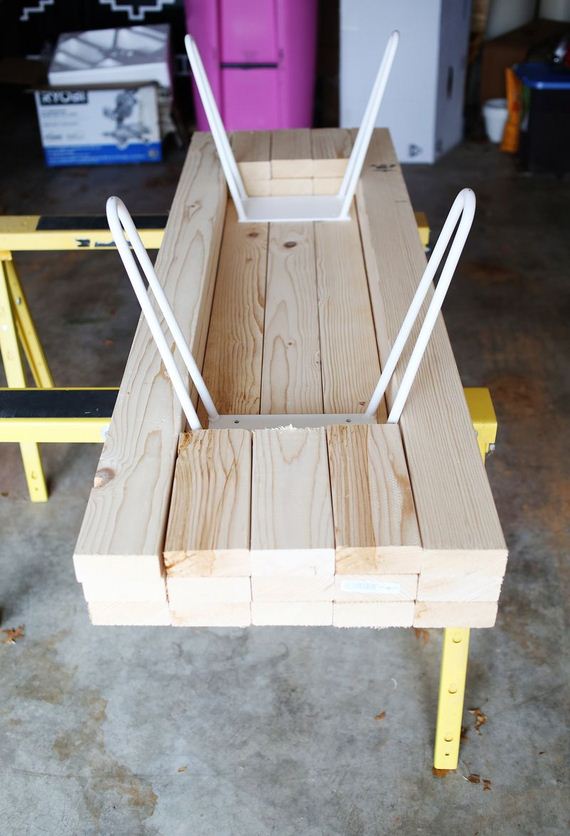
-(2) bench style hairpin legs, or 4 wooden legs (I used these)
-2.5 inch wood screws (I bought a box of 50 and used about half)
-sandpaper
-Polycrylic protective finish in semi gloss
Tools:
-power saw
-power drill
-paint brush for stain
-saw horses (optional)
First cut your 2×4 boards to the sizes listed above. Set the boards up as they will be for the final look, and mark where the legs will go to ensure space.
Also, please excuse our messy garage. Trey and I built this coffee table together on Christmas Eve in our garage… and it’s a little less than picture perfect in there right now. 🙂
NOTE: If you wanted to remove power tools from the equation altogether, I bet this project could be pulled off pretty easily if you just got all your pieces of wood cut to 55 inches and simply wood glued the whole thing together. We wanted our legs to sit inside the table and wanted it to weigh a little less, so we went with a more hollow center. Either way, just throwing that out there.

Second, lay out the top layer of boards (consisting of five of the 55x2x4 boards). Keep in mind that this will be the top of your coffee table, so pick the prettiest sides. We offset every other board 2.5 inches to get that bundle of 2x4s look.
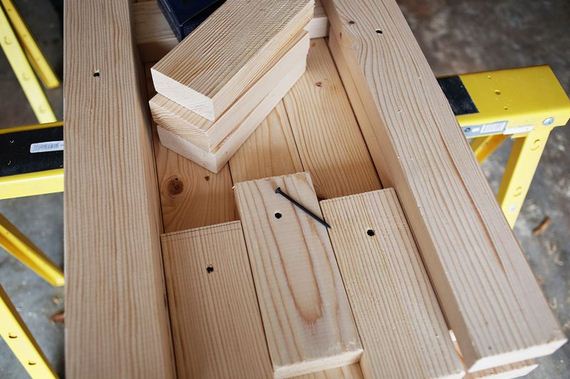
The only kind of tricky part to this table is finding the best method to hold the boards together horizontally. We opted to use a couple cross beams and hide them with the second row of 2x4s. So lay out your second row of 55x2x4s on either edge (be sure to stagger 2.5 inches). Grab your 13.5x2x4s and use them as a guide to figure out where you’ll need to put the notches. Go ahead and lay out your smaller 8.5x2x4s on the vertical edges for that row as well just to make sure they fit.
Mark the edges on your second row of 55x2x4s, so you know where to cut, and give yourself some extra room. This part will be totally hidden anyway. We used our circular saw to cut the notches, but it can be done with a jigsaw or even a handsaw + chisel. A quick google search can show you the best notching techniques based on the tools you have available. Again, it’s gonna be totally hidden, so no big deal if it’s a little/lot sloppy. Once cut, drill your second row and crossbeams into place.
Next, layer by layer, screw all the boards in place. This is where you can add a staggered, stair step look to the edge if you want. Like I said, ours is offset 2.5 inches. Once you have all the boards in place, screw the legs on as well.
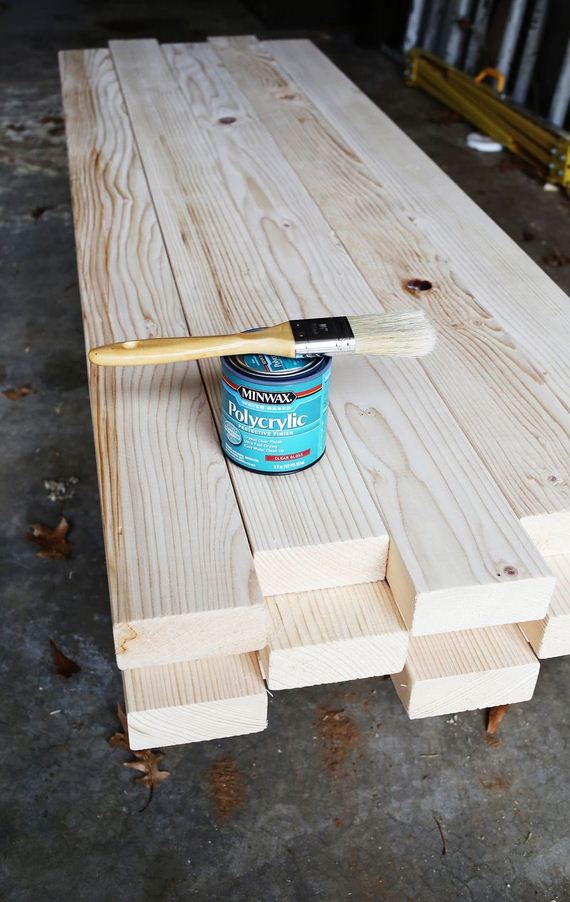
Last you’ll want to sand the entire surface and edges well. 2x4s aren’t always the smoothest. Then seal with a few layers of semi-gloss polyurethane. We chose not to stain the wood as we wanted to keep the light, raw wood color. But if you want to stain before sealing—go for it. I’m not going to stop you. It all depends on what will look best in your space.
This coffee table turned out to be much sturdier than any of the others we’ve had in the past, making it a perfect spot to kick your feet up at the end of the day. Thanks for letting us share! xo. Emma (+ Trey)